Showing posts with label silhouette Cameo. Show all posts

December Daily days 26-31

Wednesday, January 30, 2019


I forgot to share my last few days of December Daily 2019. I finished on January 2 and love it.

Day 26 - Mom and I tried to go shopping after Christmas, but we just weren't feeling it. We still have fun though.


Day 27 - time to start setting up my 2019 planners!


Day 28 - Top 9 on Instagram
Day 29 - I'm loving our new Nespresso machine


Day 30 - our day trip to Asheville, NC


Day 31 - celebrating New Years Eve


The end!


I love reading each and every comment! Be sure to keep up with me on Instagram, Pinterest, and Facebook!

December Daily days 19-25

Thursday, December 27, 2018


I'm still going strong with December Daily and have a few more days to show you.

Day 19 - cookies and fudge from our moms.


Day 20 - holiday music


Day 21 - Disney holiday magic


Day 22 - decorating cookies


Day 23 - The Grinch


Mom saw a post on instagram where someone made this cut file out of 3 separate cut files. She played around with it one night, but couldn't get it quite right. I started over and figured it out and now we both have a gorgeous insert for our December Daily!


 Day 24 - dinner at Mom's

 
Day 25 - Christmas - the stocking cut file is here.


I love reading each and every comment! Be sure to keep up with me on Instagram, Pinterest, and Facebook!

December Daily title page and Days 1-5

Friday, December 7, 2018


Lots to share today!! Have I mentioned how much I love this project??

I've seen a few people use the box flap in their album, and thought it was genius... I added oval chipboard pieces to the middle to make it easier to lift.


I cut down a 12"x12" white star transparency and adhered my Cameo cut "december" on it.


I suppose I could add "2018" on this page, but I'll have it on the album spine so maybe not.


I must do more paper piecing. It's worth the time and effort.


I used a small stamp to number my December calendar and I placed it right behind the mosaic tree. I may or may not add a large tag with "intentions" right here too.


Day 1 is all about my subscription to Sips By. I have grown to like hot tea (especially at night!) but never know which ones to buy. Now I don't have to figure it out because I get 4 different teas to try each month. I chose caffeine free teas, obviously, but you can get caffeinated too.


Day 2 is all about decorating at home. I needed to start getting into the Christmas spirit, so I figured decorating would help that out. It did!  


I created this embellishment tree before December started. I love how it turned out.


Day 3 is about 8 of our favorite Christmas movies. I took a screenshot from each movie and put it in a 2" square pocket page that I cut down.


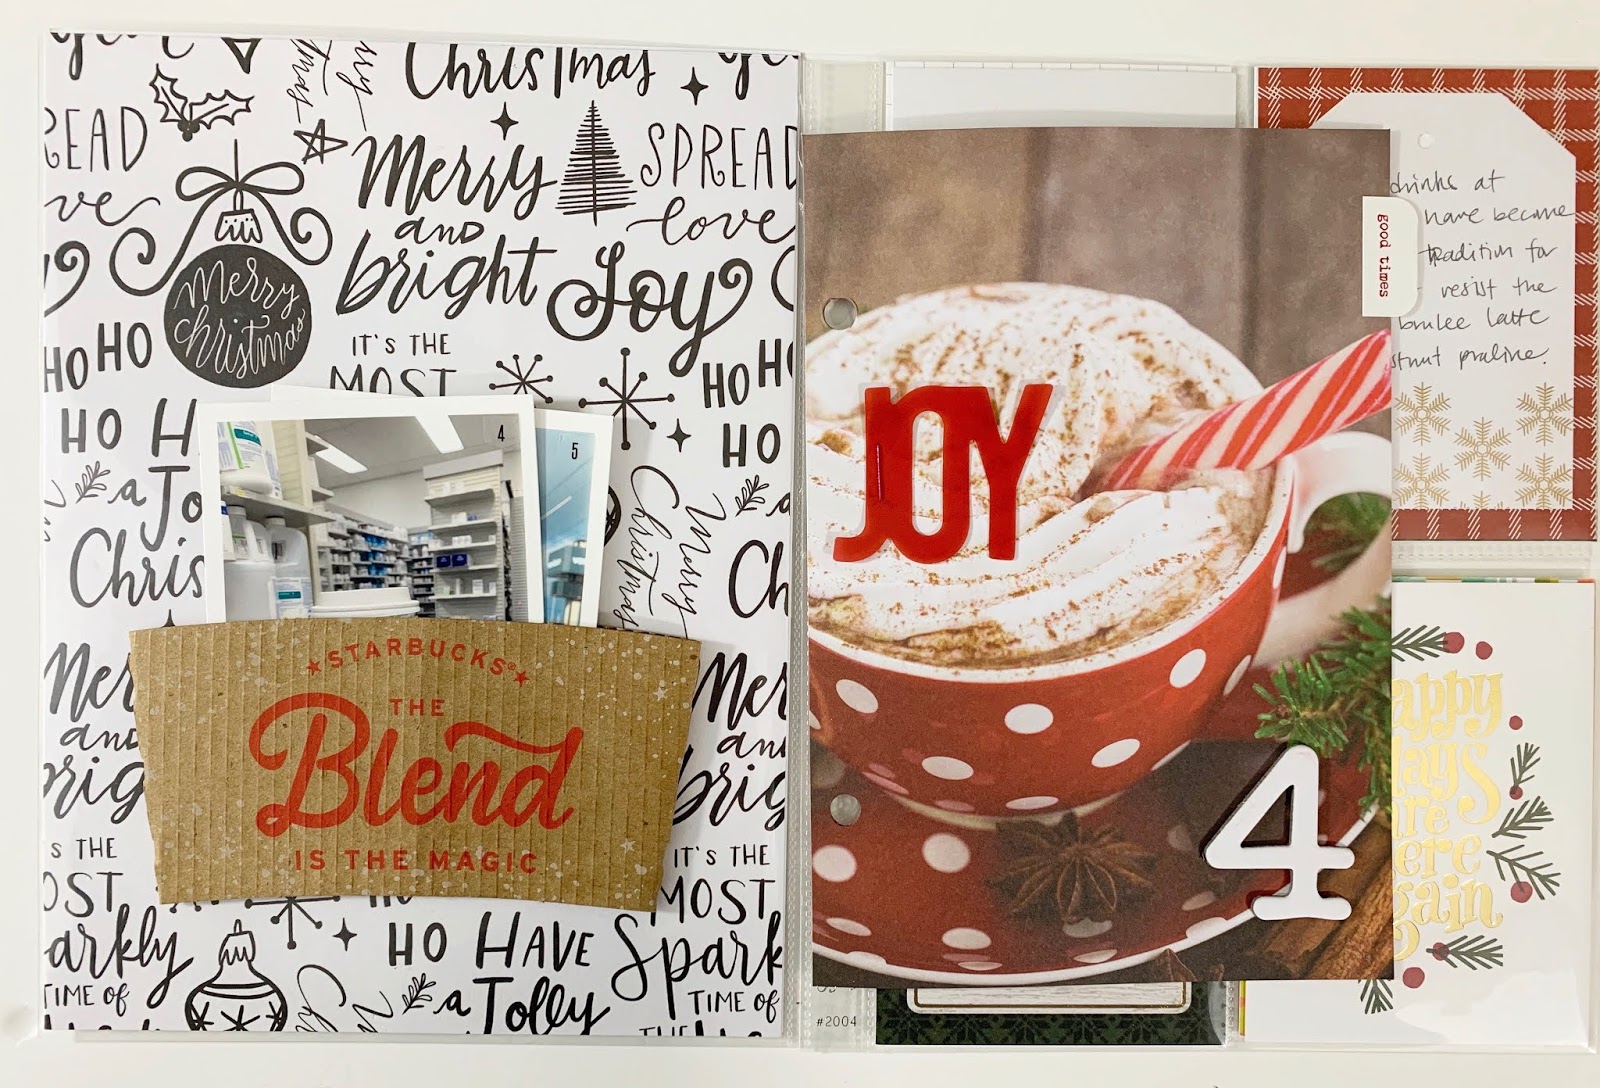
Day 4 - I made a pocket out my Starbucks coffee cup sleeve and adhered it to the outside of the page protector.

I'm going to add photos of all the holiday drinks I have this month. I found tiny little date stickers and will add the date that I get each drink.


Day 5, when we had a great family dinner and I forgot to take a photo. Oops!

I love reading each and every comment! Be sure to keep up with me on Instagram, Pinterest, and Facebook!

December Daily 2018 beginnings

Thursday, December 6, 2018


I'm happy that it's December and time to start working on December Daily again! I've completed albums in 2016 and 2017 and it's one of my favorite projects that I do. I did a little bit of prep work before December. I don't make things for specific days, but I like doing some messy or time-consuming things before the month starts.


Y'all. I love this tree so much!! It's the first time I've ever done paper piecing and wow!! It took a while, but it was so worth it. You can find it here in the Silhouette Design store. I used a stamp for the joy, love, hope, and peace tags and then heat embossed them with gold embossing powder. I used a font (don't know which one) and offset it to make it a little thicker and cut out "december".


This black and gold tag was made with a Heidi Swapp art screen. I don't know why I waited so long to finally use it!! It's gorgeous! The hexagon page is a free cut file over at Paper and Spool.

I used Tim Holtz stencils to make the 2 black and gold tags. The stocking can be found here in the Silhouette Design Store.


This cut and fold tree file can be found here in the Silhouette Design Store.


I found this Simple Stories SNAP album on clearance last year, and it's perfect for my 2018 December Daily.


I love reading each and every comment! Be sure to keep up with me on Instagram, Pinterest, and Facebook!

Let's talk Planners - and a freebie!

Monday, January 1, 2018


Happy New Year! I spent the day straightening up, finishing products, cleaning up my craft desk, and hanging out with hubby. I also made some Happy Planner stickers!

I started using the Happy Planner last year and I love that it's a disc bound system. That means I can add pages, remove them, add photos, and more. I'm not a big decorator but I do have a ridiculous sticker stash and I plan on using it a little more than I did last year. I need room to write, people! This is a functional planner.

So I'm using two planners this year and made stickers to go with each: a mini Shake it Up Happy Planner that I'm using for fitness (got it at Michael's). I made scale stickers and yoga stickers. I do a weekly weigh in and will add those stickers to the weekly pages. The yoga stickers will be put on the monthly pages on the days I do yoga. It will be neat to see those calendars at the end of the year!


My other planner is the classic Striped Floral Happy Planner for my every day stuff (it was a Hobby Lobby exclusive). I wanted a way to keep up with when I finished books so I'll add the book icon stickers to the bottom section of my planner on the days I finish a book. I've found that my week goes SO MUCH SMOOTHER when I make time to plan my week on Sundays... so I'll be adding these cute "Happy planner" stickers to my Sundays!


I made these stickers a couple of ways and thought I'd share in case you were inspired to make your own. In all cases, I opened the pictures of my planners in the design file so I could use the eye dropper tool to select colors from the planner. Then you have color coordinating stickers!


Scale: I bought some printable scale stickers on Etsy, copied and pasted one scale into Silhouette software, and traced it. I made the scale "no cut" and then drew a square around it for the cut lines.

Yoga: I took a regular cut file from the Silhouette store, made the lines "no cut" and then drew a circle around the yoga girl. I just had the circle lines as cut lines.

Book: same as the yoga girl except I made a square shape around it for the cut lines.

Happy Planner: I just drew this one out of basic shapes! I made a rectangle for the book, added a heart and drew little skinny rectangle boxes for the discs. Again I drew a shape around the whole thing for the cut line.

If you're like me and need a little reminder to schedule some planner time in, feel free to download the Happy Planner cut file for your Cameo! I left it editable so you can change the colors to match your planner if you want!


Do you use a Happy Planner?

I love reading each and every comment! Be sure to keep up with me on Instagram, Pinterest, and Facebook!

December Daily Day 1

Friday, December 2, 2016


December 1 was the last day of working 7 in a row, so I crashed on the couch after work. Joe and I watched National Lampoon's Christmas Vacation (one of our all time favorites) and just relaxed.


I cut down a 12x12 MAMBI sheet from a paper pad I got last year. The colors work well with the Pam Garrison mini kit I used on the right side of the layout.


I'm loving my numbers!

I love reading each and every comment! Be sure to keep up with me on Instagram, Pinterest, and Facebook!
Silhouette Cameo Crafts

Wednesday, November 30, 2016


I haven't been a good blogger or picture taker, but I have been making some Silhouette Cameo crafts during my months of not blogging :)

A friend of a friend was looking for an anniversary gift. She found just what she wanted on Etsy, but couldn't order and receive it in time. I used scrapbook paper to cut out hearts, put pop dots in between  the layers, and mounted them on white cardstock in a 12x12 frame. She chose custom text to highlight the couple's names, family members, and special places. I love how it turned out !


Another friend of a friend was celebrating her baby's first birthday and wanted a "Wild One" theme. These little crowns were put on wooden dowels, placed in mason jars, and used as centerpieces I found a crown in my Silhouette library and stretched it to the shape I wanted, then offset it to make the larger crown. I typed out "WILD ONE" on a 3D banner from my library and printed and cut them. I also made a cake topper and cut letters out for a banner for her.


A friend turned 40 and I had fun making these pretty medallions with a glittery gold "40" on them. 


Another friend asked me to make a little street sign to go on a Freddy Krueger wreath she was making for her niece. All the signs she found were metal and were too heavy to be placed on the wreath. I drew a rectangle, put an oval on it, and combined them into one shape. Then I offset the new shape to get the larger shape. I cut 4 pieces of the outside silver piece to make it more 3D. I did 2 layers of the letters.


What have you made with your electronic die cutting machine lately?

I love reading each and every comment! Be sure to keep up with me on Instagram, Pinterest, and Facebook!

Thanksgiving Banner

Friday, November 25, 2016


This year, I hosted Thanksgiving for the first time. My mom came over the day before and helped me get everything set up. Afterwards, we made a little Thanksgiving banner with my Silhouette Cameo. So cute and simple to make!


I used Lori Whitlock's "The Story of Fall" 6x6 paper pad to make the acorn caps and brown and orange cardstock for the acorns and leaves. We just found the shapes in the online store and downloaded them. She punched holes and strung some twine to make the banner.


Although we used different paper than I used for my "Hello Autumn" wreath, it coordinates just fine! Hope you had a happy thanksgiving!

I love reading each and every comment! Be sure to keep up with me on Instagram, Pinterest, and Facebook!

Monogrammed Vinyl Cups

Thursday, January 14, 2016


I have another vinyl project to share with you today! I used Oracal 651 vinyl and some double-walled tumblers to make these personalized cups for my coworkers.


I downloaded a phone app called Monogram Lite. I made my monograms, opened them in Silhouette Studio, traced them, and sized them. I used the rhinestone feature in the Designer Edition of the software to make the dotted rings on some of the cups. 


I love how these turned out. I need to make myself one with the script font overlay!

I love reading each and every comment! Be sure to keep up with me on Instagram, Pinterest, and Facebook!

LinkWithin

Related Posts Plugin for WordPress, Blogger...
Proudly designed by Mlekoshi playground