The Scrap Gals podcast

Monday, September 29, 2014


Hey! Let's get serious for a minute.

Just kidding! Today I'm sharing something super fun!


Have you listened to The Scrap Gals podcast? The hosts, Tiffany and Tracie, are hilarious Southern best friends that love to scrapbook. They are complete opposites in regard to their scrapbooking processes. I relate to each of them on different aspects, and it's always interesting to hear another viewpoint. I literally LOL while listening to them in the car on the way to work. Anybody that looks at me at a red light probably thinks I'm nuts, but I don't care!

When Tracie asked me to answer a question for them for an upcoming episode, of course I said yes! The episode is called "Setting the Stage" and is about the rituals/processes we go through in order to be able to scrapbook. You'll have to listen to hear my answer. There are 3 ways to listen and you can get started right here on their website. I've been subscribing on iTunes since they started!

What are the rituals/processes you go through in order to be ready to scrapbook?

I love reading each and every comment! Be sure to keep up with me on Instagram, Pinterest, and Facebook!

Trying Brush Script

Thursday, September 25, 2014


So I've been infatuated with Kal Barteski's brush script art for quite some time now. I have almost zero experience with painting so I didn't think it was something I could do. But when Mom and I went to one of our classes at CKC Charlotte, we tried brush script. We picked a preprinted phrase, cut it out, and inserted it into a vellum bag. Then we used india ink to trace the phrase onto the bag. The india ink dries a little lighter than I prefer. Part of what I like about Kal's work is how stark and graphic the black words are against the white background. She uses other colors too, but the black and whites are my favorite. Maybe. I'm kind of digging the ones with color behind the words. I'll take one of everything, please!


One night I decided to sign up for Studio Calico's class called Life Scripted. It includes several videos where Kal teaches you how to do brush script. I LOVED THE CLASS!! At first, I used acrylic paint and was somewhat satisfied with it. I went to Michael's later that night and got the medium that Kal uses - it's called gouache ("gwash"). It's sort of an opaque watercolor.


I also practiced the alphabet. I used plain printer paper (cheap!) and a little mixed media sketch book I got at Michael's. I felt a little bit like an artist with all these pieces of paper scattered all over my craft room!


I didn't have quite enough gouache on my brush here. I was also using a larger brush than I wanted. I couldn't find small size 2 or size 4 bamboo brushes at Michael's or Hobby Lobby. I did find some online and they're on their way to me! Can't wait to try them out.


This is actually painted on a light blue piece of card stock. My camera wasn't cooperating with me, but that's okay. I plan to cut this down and put it into my sadly neglected One Little Word binder (which I've actually been working on recently. More to come soonish).


Have you tried brush script?

I love reading each and every comment! Be sure to keep up with me on Instagram, Pinterest, and Facebook!

Around Here

Monday, September 22, 2014

As of late...


  • Counting down the days to Disney!
  • Getting ready to try Jamberry Nails. I can't do regular polish (I always mess it up) and I'm kind of tired of gels.
  • Celebrating Joe's 41st birthday. I got off early last Sunday so we went to Knoxville for the night. Had a great dinner at Ruth's Chris. Walked around Market Square and the mall the next morning before lunch at Pelancho's. 
  • Feeling really old when I realized I celebrated my 21st birthday at Pelacho's - 12 years ago!!!!
  • Waiting for the estimate from the tile company.
  • Thinking about picking out paint for the bathroom. Now to convince Dad to help me paint. :)
  • Having fun at Rhythm and Roots this past weekend. Great music, great friends, great food.
  • Loving brush script. I'll show you my first attempt later this week.


I love reading each and every comment! Be sure to keep up with me on Instagram, Pinterest, and Facebook!

Project Life Wedding Guest Book

Friday, September 19, 2014


Today I'm showing you the second wedding project for my friend. I had picked up the wedding mini kit at Michael's for like $6 on clearance and just knew it would come in handy one day. Her wedding colors were black and light purple, and this kit is black, white, and gray. I just picked up a few pieces of lilac patterned paper at the CKC show Mom and I attended. I cut them into 3x4 and 4x6 pieces and mixed them in with the wedding mini kit. I already have tons of PL pocket pages so I didn't have to buy any.


I reprinted the pictures I used on the memory board and made a spread in the guest book. Finally used up some of those hoarded letter stickers from the Target Dollar Spot too (and I still have a ton left, but oh well).


Sweet title. I looked down on the floor and that little heart was laying there. I guess it had fallen out of a cut file I had made on my Cameo at some time... serendipity!


I was able to customize some Wedding Mad Libs from KINDstudio on Etsy. They were so affordable and the shop owner was super easy to work with. She resized the image to make it fit into my Project Life pocket pages. I got them printed, cut, and corners rounded at UPS. So worth it!


I used Design D throughout the book. All she has to do is just slip the Mad Libs and pictures from the wedding photo booth into the pocket pages and she will be able to create a guest book in no time!


She can mix up the layouts and move any cards she wants.


I used a few Design X in the book... that gives her an extra spot for an extra pic or Mad Lib. Or she can just keep the patterned paper as is.


I cut out a few shapes on my Cameo and used some MAMBI wedding stickers for simple decoration.


And some pretty Heidi Swapp script stickers.


I also included just a few empty pages in the back for her to slip in photos of her ceremony, reception, and honeymoon. I gave her the leftover cards, papers, and stickers to use if she wants to switch up anything. She loved it!!

I seriously love this project. I wish I had known about Project Life when I got married!

I love reading each and every comment! Be sure to keep up with me on Instagram, Pinterest, and Facebook!

Stamp Storage

Wednesday, September 17, 2014


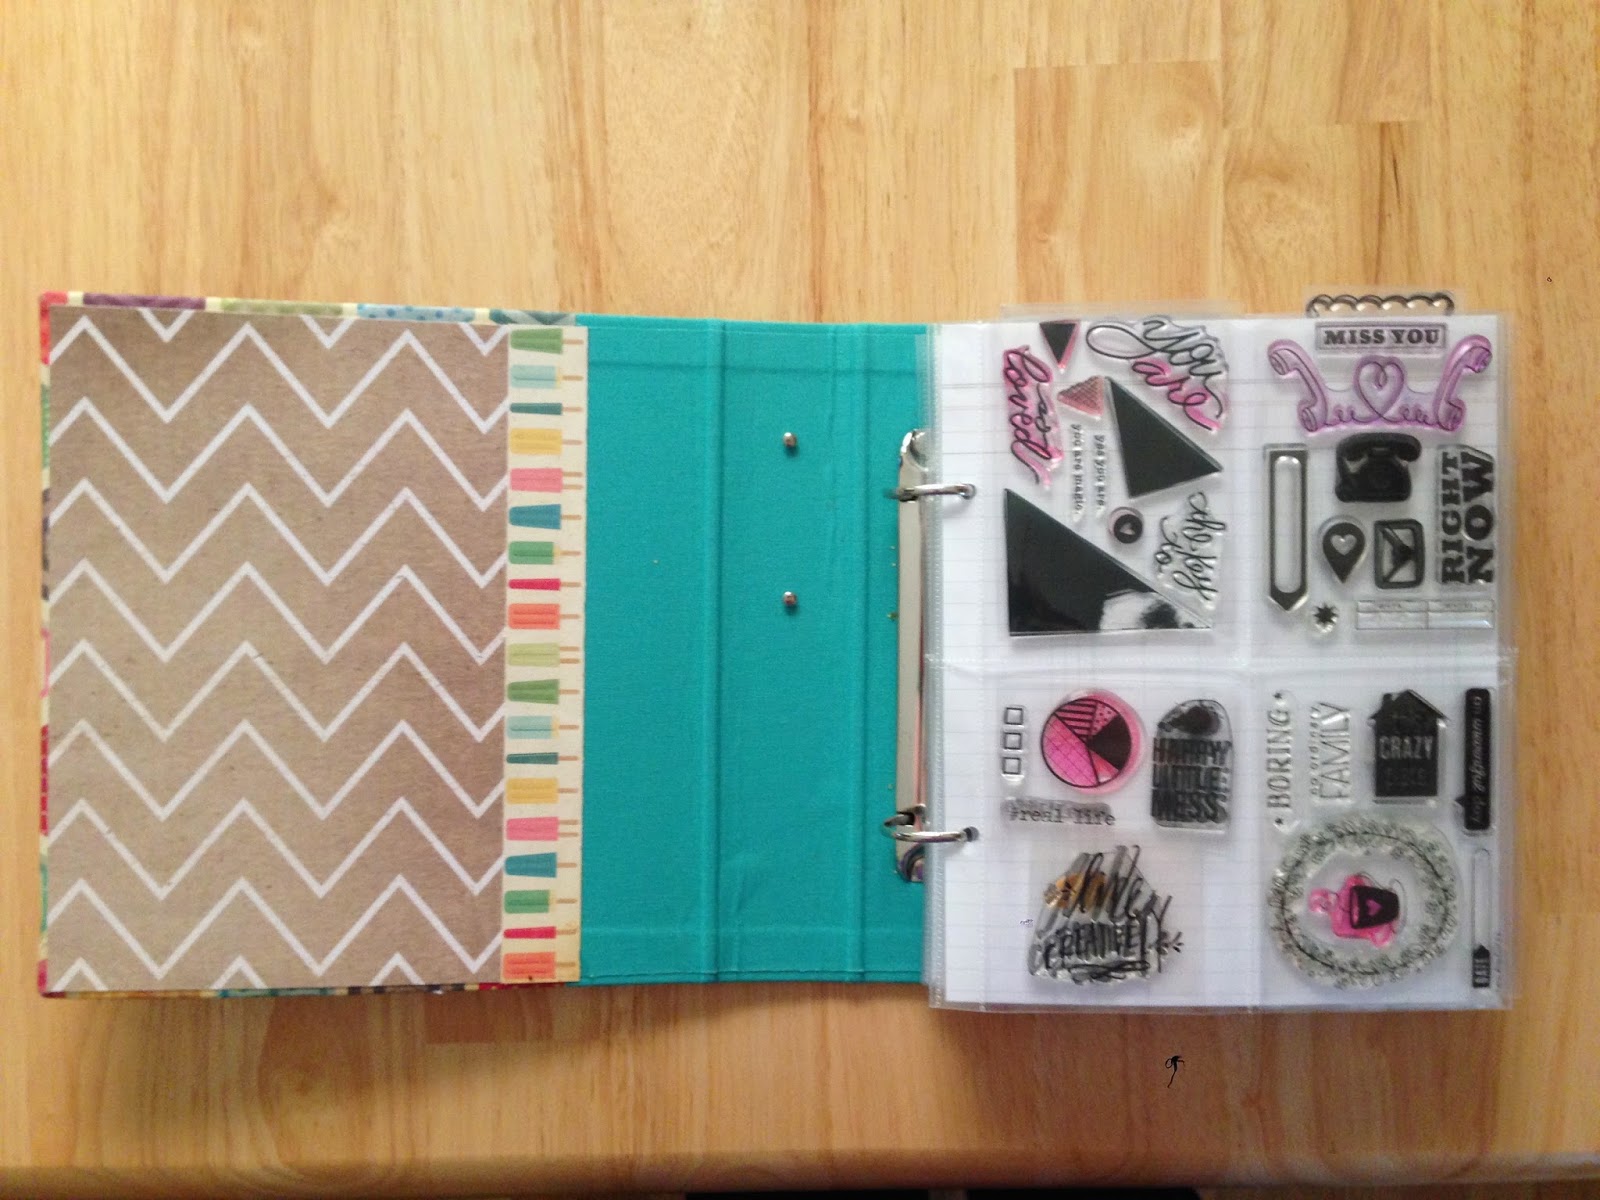
When I used my stamps the other night, I realized I hadn't shown you how I'm storing them now. I used to have my stamps thrown in a box. Not in sight = not used. I reused a little SN@P binder I had and love how easy it is to flip through my stamps now. Hopefully I'll get some more use out of them!I used a variety of page protectors to accommodate the different stamp sizes.


I put a piece of SN@P card stock in between each divider so I could see the stamps more easily.


A little piece of washi tape helps keep these stamps in place.


How do you store your stamps?

I love reading each and every comment! Be sure to keep up with me on Instagram, Pinterest, and Facebook!

Project Life Weeks 31 and 32

Monday, September 15, 2014


For weeks 31 and 32, I tried something different and created a monochromatic layout. The green pillow Harley's resting her head on really caught my eye when I laid out my pictures for this week. This is a new method for me and I love how much it can change the look of a collection. I used black and white cards from the Midnight and Kiwi collections. The bright green mostly came from the Kiwi collection.

Full spread:


Left side: visiting with Dad and Harley, a #throwbackthursday Instagram of me and my bff Erin at Bonnaroo (10 years ago!!) and the bridge I walk across at work. I started at a new location (same company) this week.


Right side: CKC Charlotte with Mom. I used a PL card to leave Joe a note on the bathroom mirror, Mom and I donated lots of goodies at the show, we took 2 classes, and then drove around Saturday night taking pictures of downtown. Good stuff!


The green alphas and clear black stickers from MAMBI really tie the pages together.


I like those monochromatic look and will be using it again!

I love reading each and every comment! Be sure to keep up with me on Instagram, Pinterest, and Facebook!

How to Create Curved Text on your Silhouette Cameo

Friday, September 12, 2014


Here's a quick tutorial on how to curve text on your Cameo. This is how I made those cute little custom banners on my Cameo for my friend's wedding board.


It's pretty simple once you get the hang of it! There's more than one way to do this, but here's the way I got it to work.


First, open up your banner. I used this one from the Silhouette Online store. I moved the background (the one I cut in black) off the mat.
 Then select the banner and duplicate it.
Select the Text box and write out your name or phase. Adjust the font and size to fit your project. Notice that little circle on the left side of my text? (double click your text to get it to appear on your screen). Drag that circle onto one of the lines of your banner.
 Now your text follows the path of the banner. Since this line is now a text path, it won't be cut.
 Over on the left side of your text, there is a line where you can move your text up and down. When I was making the banners, I couldn't get the text to go down far enough... So that's why I duplicated the banner and placed it over top of the text. That allowed me to get the text exactly where I wanted it to print.
And here's your final banner, ready to print and cut. Just print onto your paper. Then adjust your cut settings so that your Cameo blade will cut the outside of the banner.
You can place your text onto any shape - a circle, a square, whatever.

I love reading each and every comment! Be sure to keep up with me on Instagram, Pinterest, and Facebook!

LinkWithin

Related Posts Plugin for WordPress, Blogger...
Proudly designed by Mlekoshi playground