February Random Act of Kindness

Monday, February 11, 2013


I'm a member of a facebook group called SMASH*aholics. Someone started emailing a list of members that would like to swap postcards, smashable goodies, and RAKs (random acts of kindness). A couple of months ago, I decided to start sending 5 RAKS per month to 5 random people off the list. It only costs a few dollars, and it brings me joy to make the RAKs. The recipients aren't expecting anything from me, which makes it even more fun. I really enjoy surprising them and (hopefully!) brightening their day. One reason I started sending the RAKs is because I often buy a pack of something and can't use everything or don't need that many duplicates. Now I can use what I need and spread the love to some other people. This is also a great way to practice or try a new technique that you've been wanting to do.

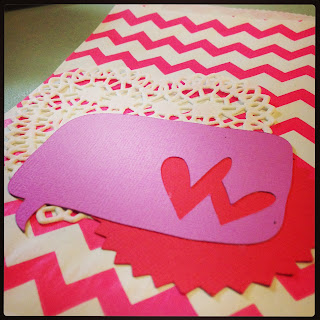
This month's RAK was love/Valentine's Day themed (of course). I included heart paperclips, foam stickers, heart stickers from Target, a couple of Silhouette Cameo cuts, and adorable greeting cards from Michael's. Even if one of the recipients doesn't have a boyfriend or husband, they can still use the embellishments on a page about their favorite things or about something they love.

valentine scrapbook

I got these cute chevron bags from The Plaid Barn several months ago. I decorated the front of the chevron bag very simply. I adhered a paper doily (20 for $1 at the Target Dollar Spot!) and then put 2 Silhouette Cameo cuts on top of it. I always lightly glue the embellishments to the bag. This way, the recipients can take everything apart if they want, and use the elements separately.

valentine scrapbook

This month, I included a few cards from the Creative Chaos line at Michael's. These packs come with 5 of each card. This is one of those instances where I don't need that many duplicates. I kept one of each card I wanted for myself, then split the rest of the pack among the 5 RAK recipients.

valentine scrapbook

I hope this post inspires you to perform a Random Act of Kindness!

I love reading each and every comment! 
Be sure to keep up with me on
  Instagram, Pinterest, and Facebook!

Wedding and Love Smash Book: True Love

Friday, February 8, 2013


So the third SMASH book I have is the cream colored wedding / love smash book. There are a handful of pages that are really wedding-specific, but the rest of them are usable however you would like. I've been using this book to document mine and Joe's relationship - dating, engaged, and married! I had a big box full of tickets and memorabilia. I think it's more fun to see this stuff in a book than it is to dig through the box. I've just been picking topics and random pages. These pages are not shown in the order they appear in the book.

The first two pages in the book have a light colored background, so I did some journaling on them. The stickers are from a sheet of little stickers I got at Walmart. I bought the sheet because it had some cute pictures on it, but ended up loving these phrases. I picked a few that told the story of when we first met, our favorite hang-out, our first date, how we knew each other was "the one", our first kiss, and more. I cut the Target washi tape into banners to separate each topic.

wedding smashbook

Here's some close-ups for ya...

wedding smashbook

wedding smashbook

On the next 2 pages, I put some of my favorite pictures of us from our first year of dating.

wedding smashbook

This page is one of those wedding-specific pages. The drawing at the bottom was already on the page. I took a screenshot of my updated facebook relationship status and picture of my ring and put on the page with a strip of wash tape. The appropriate title was "it's fb official!" Cuz really, did it even happen if it's not on Facebook? haha!

wedding smashbook

The "save the date" page was perfect for our engagement story. I just circled the month, day, and year that we set for our date. I added where the wedding took place in the Notes section.

wedding smashbook

I'll be sharing more of the pages from this book, so be sure to check back!

I love reading each and every comment! 
Be sure to keep up with me on
  Instagram, Pinterest, and Facebook!

Getting Started on Project Life

Tuesday, February 5, 2013


A few days ago, I mentioned that I had jumped on the Project Life bandwagon. If you're not familiar with Project Life, go read this. Go on, I'll wait.

Ok, now that we're all on the same page - I've been intrigued by PL for a long time, but wasn't quite sure it was for me. After all, I love too many scrapbook papers to use a kit and have everything matchy-matchy. Of course, being matchy-matchy has its advantages - it definitely gives your book more cohesiveness. Ultimately I decided I would do PL with my own scrapbook supplies and make some things very scrappy and other things more streamlined. I'm gonna try not to go overboard - I want this to be easy and doable!

I worked on making my own 'kit' and the title page over this past weekend. I don't think I'm finished with the title page yet, but I love it so far. What is it missing? I'm thinking our last name or a picture of us... or both... 

project life cover page

Here's some close-ups for ya...

project life cover page

project life cover page

project life cover page

As for the kit, I used paper from about 10 different paper collections. I love the variety! I picked from October Afternoon (Sidewalks and Woodland Park), My Mind's Eye 6x6 pads (Chevron, Find & Dandy Boy and Girl, Miss Caroline, Dwell, Everyday Flair, Blink of an Eye), Studio Calico (Abroad), and threw in a little Basic Grey Serendipity. The Serendipity doesn't match exactly, but some of the colors do. I think it keeps everything from being too pastel.

project life diy kit

And I'm using this album - how cute is this?!? It's available here.


Alright, so are you convinced? Anybody joining me on my Project Life journey this year?


I love reading each and every comment! 
Be sure to keep up with me on
  Instagram, Pinterest, and Facebook!

How to make a Valentine Garland with a Silhouette Cameo

Monday, February 4, 2013


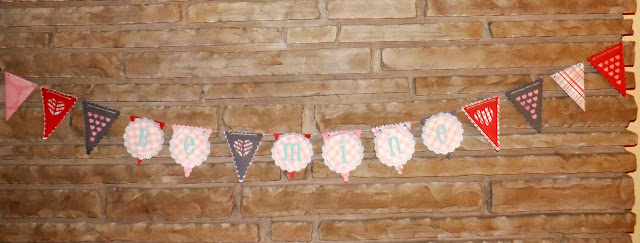
It's February, so that means it's time for Valentine decor! I used my Silhouette Cameo to make a Valentine garland / banner and hung it up on my fireplace. It's too cute! I used a few sheets of My Mind's Eye "Love Me" and red and gray cardstock to make this bunting.

Silhouette cameo banner


I started by cutting some flags out of the Heart Pennant Banner from the Silhouette Online Store. I ungrouped the image and removed the hearts for some of the flags. Then I added the Assorted Lattice Hearts to the blank flags and cut them out. Be sure to ungroup the lattice hearts and remove the heart outline around each one if you're going to put them on the flags.

Silhouette cameo bannerSilhouette cameo banner

Silhouette cameo banner


To make the words, I cut out the doilies from last week's free Silhouette cut of the week (Be Mine and Love banner), adhered chipboard letters to them, and glued a Martha Stewart cupcake wrapper on the back. I think the wrapper gives it a lace-y look and makes it prettier. The cupcake wrappers were on clearance at Michael's last weekend.

Silhouette cameo banner


Last time I went to Target, I grabbed some sparkly gold baker's twine in the Dollar Spot. I just knew I would need it for something. This garland was perfect for it!

Silhouette cameo banner


I love the way it all came together.

Silhouette cameo banner

I love reading each and every comment! 
Be sure to keep up with me on
  Instagram, Pinterest, and Facebook!

Junkin - Vintage Record Stand Repurposed

Saturday, February 2, 2013


Yesterday I kicked off my 3-day weekend by going to a couple of antique / junk stores (whatever you like to call them). I'm always on the lookout for several things... vintage Pyrex, postcards, old pharmacy memorabilia, crocks, owls, crafting materials, shelving, baskets, Valentines, spools of thread, retro furniture, and anything else that catches my eye. I like to get a good deal, but I've been known to pay full price if I really want something.

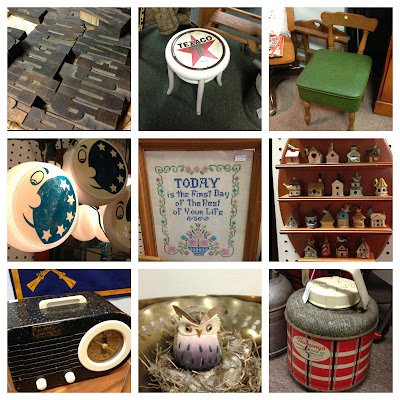
Here are just some of the super fun finds I spotted at the stores yesterday...

antique store finds

Left to right and row by row: (1) typeset letters - big ones were $2 each and small ones were 2/$1!!! (2) metal Texaco stool (3) sewing chair with a flip-up seat just like the one I already have - of course mine has cuter fabric ;) (4) gorgeous vintage patio lights (5) needlework affirmation (6) tiny ceramic birdhouses, each with a bird on top - they were so cute (7) radio (8) adorable owl (9) vintage cooler

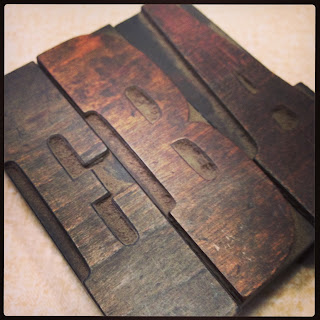
You know I brought some stuff home. I got a wooden cheese box (perfect for storing small odds and ends for papercrafting) and a pretty, retro flower pin. I also got some of those typeset letters. I picked big ones for my initials, and small ones for my last name and for Mom's name - I mean, who could pass up that price? Plus I'd never actually seen any for sale. Actually, I had to restrain myself from buying both trays of letters. And numbers. I bet they're still sitting there, waiting to be bought.

typeset letterstypeset letters

Anyways - my favorite find of the day was a seafoam green record stand for $12! I knew it would be perfect for scrapbook paper packs and collection packs. And it fits in my craft room closet perfectly!!

vintage record stand upcycle

Have you ever used an everyday item for craft storage? Tell me or send me a link in the comments. I'd love to see what you've done!

I love reading each and every comment! 
Be sure to keep up with me on
  Instagram, Pinterest, and Facebook!

Currently

Friday, February 1, 2013


One day I stumbled across a blog with a fantastic idea - Kristin's "Currently" project. The point is to stop right now and take a look around - and document what you're doing right now. It just takes a minute. Hers is a weekly project, but I'm going to do it monthly on this blog and Instagram weekly in my new Project Life book!! This is a great thing to include in PL. Here's my first #currentlylist

#currentlylist

Oh, and I *just* jumped on the Project Life bandwagon just a couple of nights ago. All my stuff came from Amazon today and I can't wait to get started on it this weekend. I have some catching up to do for January (scrapbook weekend, hells yeah!) While I had a great time doing PL in my Smashbook last year, I think I'm ready to do it in a more traditional PL style. With lots of scrappy elements. And no card collection from PL. I'm not forgetting this year's mission - use my stash!!

Could you commit to the Currently project? It will be very neat to look back and see what you were into at that time.


I love reading each and every comment! 
Be sure to keep up with me on
  Instagram, Pinterest, and Facebook!

Scrapbooking: a Mini Book for a pet

Tuesday, January 29, 2013


My husband had a dog (Gruffy) for almost 12 years. I only knew Gruffy for about 3 years. It was very difficult for me to adjust to having a dog in the house, but in the end he grew on me. He was sweet. When Gruffy passed away last year, I wanted to gather photos and make a mini book about him.

I used a cardboard 6x6 mini book and 3" rings. I found a paw print scrapbook paper at Hobby Lobby and used that as the basis for my color scheme. I mostly used papers that look like burlap, wood, and plain colors.

I covered a chipboard 'G' and inked around the edges for the front cover of the book.

pet scrapbook

I kept most pages pretty simple and let the photos tell the story. I used word stickers, borders, washi tape, embellishments, punches, brads, cutouts from several scrapbooking lines, and banners.

I used some of my favorite Thickers on this page.

pet scrapbook

I created a word cloud here.

pet scrapbook

Here's one of my favorite Instagram shots of Gruffy.

pet scrapbook

Here he is at Joe's parents house... he wasn't allowed on furniture but he was always sneaking onto the couch when no one was around!

pet scrapbook

Gruffy had just been to Pet Smart that day and got prettied up.

pet scrapbook

Here's Gruffy when we moved him to our house after our honeymoon.

pet scrapbook

Here he is coming up the back steps at Joe's parents house.

pet scrapbook

Cutest picture ever taken of Gruffy, in my opinion - look at that face! :)

pet scrapbook

I used a punch from Stampin' Up to create this banner.

pet scrapbook

Washi tape looks great on simple pages.

pet scrapbook

Here's Gruffy all loaded up in the front seat of the truck.

pet scrapbook

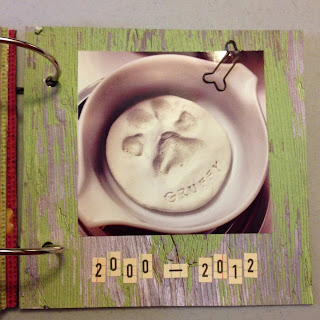
The veterinarian made a paw print of Gruffy. It's the sweetest little momento. His paw was so big!

pet scrapbook

Have you ever made a book about your pet?

I love reading each and every comment! 
Be sure to keep up with me on
  Instagram, Pinterest, and Facebook!

LinkWithin

Related Posts Plugin for WordPress, Blogger...
Proudly designed by Mlekoshi playground