Showing posts with label Bind-it-All. Show all posts

30 Days of Lists - September 2013

Friday, August 30, 2013


So it's almost time for September's #30Lists!! It's a fun way to capture the 'right now' of your life. How fun will it be to look back on this in 5 years? You can make your lists as simple or as complex as you want - use a small journal you already own, make your own mini book, or grab a daybook and get documenting! Are you in? It's not too late to join!


Last March, I used a Smashbook to record my lists. This time I decided to make my own minibook using the new Glitz 'Wild and Free' paper collection. You know those gold Thickers had to be part of the title. I used Heidi Swapp ColorShine on the cork arrow to make it gold. I love how it turned out!

Here is the inside cover (the back inside cover matches) and first page:


 I used my Bind-It-All and a 6x6 paper pad to make the album. 


These papers are already double sided and the scale of the pattern is perfect for a small book. 


I used the coordinating sticker and alpha sheets to embellish some of the pages: 


 I left plenty of room for journaling on all the pages


On some of the busier patterns, I will be adding a small card to the middle of the page for journaling. 


You'll still be able to see a wide border of the patterned paper around the outside. I may use project life cards, but I'm not sure yet...


I still have lots of coordinating stickers that I'll be adding to my finished lists.

Hope you consider joining the #30lists challenge!!

I love reading each and every comment! Be sure to keep up with me on Instagram, Pinterest, and Facebook!

Heidi Swapp Memory File Adventure - Week 1

Friday, May 10, 2013


I'm having so much fun with this project! I'm really glad I made a little kit from my scrapbooking stash before I got started. That's made it so quick and easy to grab embellishments. I followed the instructions for Week 1 and it came together pretty quickly.

Be sure to check out my Memory File board over on Pinterest. I'll be pinning my creations, Heidi's blog posts each week, and other inspiring memory file adventures.

For the front page, I cut out the banner-shaped page with my Silhouette Cameo. The fabric Polaroid frame is from the Maggie Holmes collection. I took the "happy life" sentiment off another frame and put it on this one. I secured it with hot pink staples (that I got in a pack of blue, green, and pinks staples from Walmart for 88 cents!). I cut a short banner from Michael's Heidi Swapp Sugar Chic paper pad and added a Heidi Swapp word phrase.


I had already cut some blank chipboard memory files in half. I then glued paper to them using Zip Dry, cut off the excess paper with my X-Acto knife, and filed off the uneven edges.


This is my front cover. I'll be adding more to it. The inside of the cover is a pink striped paper.


This is how the pages will look when you first open the book. I cut all of these banner pages on the Cameo. I just made each page about an inch longer than the last to get this cascading effect.


The second page has 4 pictures of me on it. They're fastened to the page using a sparkly blue brad. I cut apart a scalloped banner and used each scallop as a tab. It's easier to separate the pictures with tabs on them.


This is the back of page 2 and the front of page 3. They're joined by a printable accordion book (available in the Week 1 instructions linked above). I haven't finished filling out the book yet, but it's very cute.


I may add more embellishments to this page. Right now, all I have is washi tape. I stuck a little round paper cut out behind the brad.


I cut apart another banner from the Heidi Swapp Sugar Chic papers. I used pop dots under the middle pennant to give it more dimension. I added a couple more pink staples just for fun.


How cute is the sparkly blue bow on this paper clip?? It's also from Heidi Swapp. The vellum is from another printable available on the Week 1 instructions. I filled it in with "went out with Joe". I put a picture we took right before going out to dinner for my birthday. I added some Heidi Swapp chipboard heart stickers to the front of the vellum.


 I put a chipboard "love" sticker to the paper underneath. On the chevron strip, I wrote "my birthday dinner 4/14/13" and added another heart sticker.


 On page 4, the instructions tell you to make an accordion booklet to introduce the "characters" in your life, using pictures and bios. I chose to use an old zebra print pocket and make little cards to go inside. I sprayed the pocket with Heidi Swapp's Color Shine turquoise spray. I used the same spray on the Color Magic arrow and star, and added a strip of black chevron washi tape across the top of the pocket. I printed "remember this" on some vellum paper to make this page.


These are the fronts of my character cards - I included my hubby, brother, parents, and dog. I embellished with chipboard heart and arrow stickers, a black sequined star, and another sparkly bow paper clip. I used these photo tabs from Pink Paislee's Secret Crush collection on each card and alpha stickers from Studio Calico's Sundrifter line.


This is the back of each card. I picked a photo of me with each character.


Well that's it for Week 1! Hope you've enjoyed looking at my version of the memory file album. I absolutely love it. Are you following this adventure with Heidi?

I love reading each and every comment! 
Be sure to keep up with me on Instagram, Pinterest, and Facebook!

Heidi Swapp Memory File Adventure: Gathering Supplies

Wednesday, May 1, 2013


So have you seen Heidi Swapp's Memory File Adventure? I love it! I haven't done much of it, but I am really drawn to that over-embellished look. I love her memory files. She's using a memory file album, but I don't have one. Since I want to use up my scrapbook stash this year, I decided to follow along and make my own. I will bind the pages (with my Bind-it-All) when I'm done.

This week, I've been gathering supplies. I got most of this stuff in a Heidi Swapp grab box that I bought about 2 months ago. I received a few things for my birthday recently. I have stickers, flower cut-outs, banners, sequined arrows and hearts, paper clips with adorable glittery bows, Color Magic hearts and arrows, and more. I'll also be using some Color Shine mists and paper from Sugar Chic and Vintage Chic (not pictured).


I printed out some of the printables for this adventure. I had to dig deep to find that vellum paper!


I found some coordinating transparencies to use in the book. I'm excited about using these!


I have several frames to use around some of the pictures. The large yellow Polaroid type frame is from the new Maggie Holmes collection. The ones in the lower right hand corner are from Recollections (I think), and the ones at the top are Heidi Swapp.


I've gathered washi tape, blue chevron bags, stickers, buttons, wood veneers, Polaroid cut outs, smash pad pages, photo tabs, and Chic Tags to use throughout the book.


Now I just need to print some more pictures to put in the book and I'll be ready to go. I'm going to be working on this project on Friday and Saturday. My mom and I are going to be scrapbooking together both days in honor of National Scrapbooking Day. I can't wait!

Make pretty stuff!

I love reading each and every comment! 
Be sure to keep up with me on Instagram, Pinterest, and Facebook!

DIY Blog Planner using free printables, scrapbook paper, and a Bind-It-All

Friday, January 25, 2013


I'm a new blogger, but I've quickly realized that this blogging stuff has to be organized! I searched for some blog planning templates and found some great ones. I made a blog planner using from free printables from Mama Jenn and the Michael's knock-off version of Amy Tangerines "Sketchbook" papers. These printables are amazing! Although I didn't print them, included in the download are pages for Giveaways/Reviews, Blog Post Notes, and a Year at a Glance Calendar.

I decorated the front of my blog planner
with stickers, vellum, and a tag. 

blog planner

 I put a piece of green vellum over the cover page,
just to pretty it up a bit.

blog planner

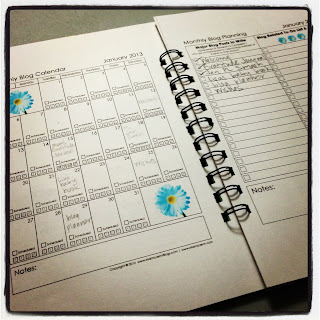
I printed the Calendar and Monthly Blog Planning sheets for each month. One thing I really liked about the calendar pages is the 4 boxes on each day. You can use those to check off promoting that blog post  on Facebook, Twitter, Google+, and Pinterest. 

blog planner

I also printed the Monthly Blog Stats. It will be interesting to see how these numbers change over the next year!

blog planner

I printed a few of the Future Blog Post Ideas and Notes pages.

blog planner

blog planner

Then I used my Bind-it-All and 1/2" black wires to make the book. 

I posted a pic on Instagram the other day and when Amy Tangerine commented and liked it, it made my day! :)


blog planner

I love reading each and every comment! 
Be sure to keep up with me on
  Instagram, Pinterest, and Facebook!

LinkWithin

Related Posts Plugin for WordPress, Blogger...
Proudly designed by Mlekoshi playground