Find Your Voice - Lesson 2

Wednesday, July 31, 2013


I'm very behind in posting (and completing!) the Find Your Voice workshop lessons. But I'm going to keep on keepin' on until I finish. It's not a race, right?? :)

Lesson Two is titled "Who Are You?" and had a couple of fun exercises in it. My favorite was to pick out 15 words to describe your personal identity. I've been admiring the pictures some other participants have been posting, and am so glad to have made my own! This picture will be going in my black All ABout Me smashbook very soon.


I used the Rhonna Designs iPhone app and added a mask to lighten my picture. Then I picked one of my favorite fonts to add the words. Quick and simple. I love how it turned out!

Which words would you use to describe yourself?? 

I love reading each and every comment! Be sure to keep up with me on Instagram, Pinterest, and Facebook!

Project Life 2013 - Week 28

Monday, July 29, 2013


I really love how Brooke takes her Project Life pictures over at Grace and Light, so I thought I'd try something similar this week. I usually take my PL pictures in the kitchen. This is the first time I've used the dining room table. I think I like it! Ignore the glare on a couple of the pictures. I'll figure it out!

Full spread: I didn't have a ton of pictures of everyday stuff this week. I added a 6x12 insert because I had a pamphlet I wanted to keep (and not cut up!). Mom and I went to the Scrapbooking Expo in Duluth, Georgia again this year. So fun!


Left Side: polka dot French manicure, tostados, Apple TV, mismatched flip-flops:


I slipped my feet into mismatched flip flops! So glad Joe noticed, haha! (and that I wasn't out in public when he noticed!)


I've been wanting to try breaking up a word and putting it on 3 lines. These Amy Tangerine (I think? Correct me if I'm wrong) chipboard tile alphas were perfect. I found them at Big Lots!


The 6x12 insert and part of the Right Side: this Summer Shandy beer has become a staple in our house, so I wanted to document it.


back of the 6x12 insert and Right Side: the Scrapbooking Expo trip. The back of the insert feels a little unfinished... maybe it needs a title at the top?


Right Side:

I cut a little folder out of double sided scrapbook paper and made a spot for my receipts from the Expo.


I love this Martha Stewart sticker!


I love reading each and every comment! Be sure to keep up with me on Instagram, Pinterest, and Facebook!

Project Life SMASH book July 2012

Friday, July 26, 2013


It's time to show you July 2012's Project Life SMASHbook. Have you seen the first 6 months worth of posts??

I hurt my neck and shoulder and had to start physical therapy. It was going to last for 5-6 weeks, so I journaled about it. I added the 'or 6!' Thickers to continue on the '5' title of the journaling card. My husband's dog passed away, so I included a little tribute to him. Joe's mom made me a patriotic wind sock, so I added a picture of it. I mostly embellished with stickers on these two pages.


One of the best parts of the month was when Mom and I went to the Scrapbooking Expo in Duluth, Georgia! We had a fantastic time. I stapled my 'Friday' wristband to the program. I made a pocket out of speech bubble scrapbook paper and wrote on a couple of spaces. I outlined the pocket in washi tape. I journaled about our trip and about mine and Joe's first night away from each other since we have been married. <3 A couple of arrows and more washi tape finished up the pages.


I love reading each and every comment! Be sure to keep up with me on Instagram, Pinterest, and Facebook!

Organizing Project Life

Wednesday, July 24, 2013


There are so many little bits and pieces that I want to incorporate into my Project Life album. I had to get organized so I could keep up with it all and remember to use it. Thought I'd share a few tips to help you too!


I keep everything in this basket on my craft table. I try to keep it somewhat limited so that I'm not overwhelmed with choices. I can usually find what I want to use - I only go digging through my regular scrapbooking stash occasionally.


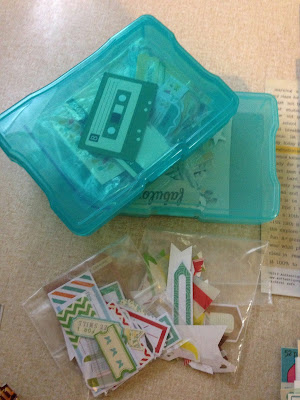
Iris boxes are perfect for keeping up with little odds and ends. I get the boxes at Michael's when they're on sale (they're super cheap - maybe $2 regular price). I also separated like items  (arrows and tabs) and put them in their own Ziploc baggies.


I have like items separated with binder clips in the basket - alphas, word/phrase stickers, labels, tabs, and stickers. This makes it easy for me to grab whatever I'm looking for and quickly look through my stuff. 


I use a medium CTMH organizer box to keep up with my cards. Binder clips help me keep cards separated. Organize into whatever categories make sense to you - I have "specific" cards - Travel, On the Blog, Summer, and Currently, grid journaling cards and core kit 'filler' cards, 'phrase' and 'quote' cards, and lined and unlined journaling cards. I keep all the filler cards and journaling cards grouped together by core kit name so I can remember which kit they came from. I haven't tried organizing by color, but that would be another way to do it.


I actually changed this on Sunday - I used my Silhouette Cameo to cut some cute little tabbed dividers. I just drew a rectangle and added some decorative tabs on the top of it. Now I'm using those dividers to keep everything organized into categories, instead of using binder clips. I just wrote the categories on the tabs. Quick and simple!


Here's what my Cameo file looked like - I used a similar method to make 4x6 dividers.


I'm a bit of a... collector of different pocket page configurations. I use them all though! :) I put all the pages in an extra binder and used a post-it note to mark where each starts. That way I can quickly flip through and see which page I want to use. I have full 12x12 pages and insert sizes (smaller than 12x12) in this binder. I have a ton of Design A and Design D (since I bought the Blush kit bundle on HSN), so I keep them in a second binder.


Do you have any great organizing tips to share with me? Let me know in the comments!

I love reading each and every comment! Be sure to keep up with me on Instagram, Pinterest, and Facebook!

Project Life 2013 - Week 27

Monday, July 22, 2013


So here's my week 27 of Project Life. I actually wasn't really feeling it when I made these pages... but they've grown on me! I like them now. :)

Full 2-page spread:


Left Side: key lime pie at Cootie Brown's, new Waffle House opened, a mess at work, 4th of July, and Jonesborough Days.


We didn't do anything patriotic for the 4th of July, but I still added some fireworks to my layout.


This little pinwheel is from Michael's. I thought it looked cute on this Kraft card.


Right side: rainy day, baby robins in our tree (isn't it a little late for baby birds?), mosquito bites, a funny text, and FaceTime with my favorite puppy.


I'm still loving these slide frames from Crate Paper's 'The Pier':


I love reading each and every comment! Be sure to keep up with me on Instagram, Pinterest, and Facebook!

5 Tips for Project Life

Wednesday, July 17, 2013


So here we are, a little over halfway through the year and (hopefully!) about halfway through with Project Life 2013. Have you been able to keep up?


I'm going to share some more tips for Project Life. Be sure to check out my tips and tricks from earlier this year. Maybe something will inspire you and encourage you to catch up (or at least keep going!) I spend about 1 to 1.5 hours each week doing PL, and prefer to spend the rest of my time making memories to document!

1. I like an eclectic (not perfectly matching) look with a color scheme that pulls it all together. Each week, I take my color cues from my premade weekly title cards. I try to aim for 3 colors per week. If my card doesn't have 3 colors, I just pick 1 or 2 colors and make that my color scheme. This helps me pick embellishments, journaling cards, and filler cards. It helps me make each week look pulled together, without perfectly matching.


3. Whenever I get a new embellishment or sticker pack, I keep it on my desk in this cute little ceramic berry bowl. It reminds me to use new items and keeps my pages fresh.


2. My process has changed slightly, but is helping me get things done in a timely manner. I mostly print 3x4 pictures, and usually just print them instead of using my post-it note method. I use different pocket pages each week. I slip in my weekly title card, preferably on the left side. Then, I lay the pictures out on the back of last week's pocket page and on the back inside cover of the album. I just move them around until I feel like the two-page spread is balanced. Next I add in journaling cards where they're needed. Then I add in quote/filler cards in any empty spots. Sometimes I embellish cards with sequins or enamel dots or something. I also like to add a simple sticker to a patterned card to make a filler card without words. Then I go get a pocket page that will work for the right page. I round all my corners, add journaling, add other embellishments, then slip them into my pocket pages. Done!

4. I still use the Momento app and a notebook to keep up with what happens each week. I've started using a binder clip to keep up with tickets, receipts, and other 'stuff' that I want to add to that week.


5. If I download free printable cards, I go ahead and print them and add them to my CTMH organizer box. If I don't, the cards never get used!


If you have a tip to share, I'd love to hear it! Add it to the comments!

I love reading each and every comment! Be sure to keep up with me on Instagram, Pinterest, and Facebook!

Project Life 2013 - Vacation!

Tuesday, July 16, 2013


This is Part 2 of Weeks 25 & 26 - we took our first long RV trip! We went to Cedar Point in Sandusky, Ohio for a couple of days, then to Niagara Falls, and took a couple of days to make our way home through New York, Pennsylvania, and West Virginia. I did a two-page spread for the trip and added a 12x10 insert (Becky Higgins Design G).

The  left side and front of the insert: I concentrated on documenting our journey on these two pages - our truck and camper, our route, the states Joe drove through, what we ate, and how we spent each day.


I used a Honey title card and added October Afternoon alphas to spell out 'Road Trip'. I added the dates after I took the picture!


We had a ton of rain one day while we were driving home, so I added an Amy Tangerine sticker and a Heidi Grace felt cloud to a free printable about a rainy day.


I used a Blush card to document what I did while Joe drove us everywhere.


I messed up the journaling that was on the bottom of the US map, so I cut the bottom half off. I centered it on top of a Studio Calico arrow card and added 'here we go' to the map.


I took a screenshot of our route and printed it out 3x4. I added little tags for the locations and cut a 4x6 card to 4x4 to mount it on.


I used the Rhonna Designs app to make this 4x4 photo! I used a little hashtag on Instagram and wanted to remember it. I took a screenshot of those pictures and added a mask with Rhonna Designs. I used one of the great fonts to spell out our hashtag. I LOVE how this card turned out!


The front of the insert:


A simple sticker made this filler card super cute!


The back of the insert and right side of the trip: Here I concentrated on the things we did and things we saw: Cedar Point, Niagara Falls, the heat, the Super Moon, and the New River Gorge.


The back of the insert: I used Diptic to make a little collage of some of the Cedar Point rides. I took pics of the campground and our campsite (look how close we were to one of the roller coasters!). I had a cute 4x6 Ferris Wheel card that I used for journaling.


The right side of the trip:


I'm linking up at The Mom Creative's Project Life Tuesday.

I love reading each and every comment! Be sure to keep up with me on Instagram, Pinterest, and Facebook!

Let's Get Together! and a SMASHbook page

Friday, July 12, 2013


Let's get together! Yeah yeah yeah!
(Do you know what movie is from? It's one of my all-time faves!)

Since Google Reader is gone (RIP, old friend), I just want to make sure we stay connected!

I've got buttons over on the right where you can quickly follow me on Bloglovin' or Feedly. Have you tried one of them? Which one do you like better? Why?

 I've also recently set up a Facebook page for Mrs. Crafty Adams if you prefer to stay up on blog posts that way. I love connecting with people on Facebook. It's a quick way for you to drop me a line or ask a question or share a project with your friends!

And of course, I post pics to my Mrs Crafty Adams Pinterest board.

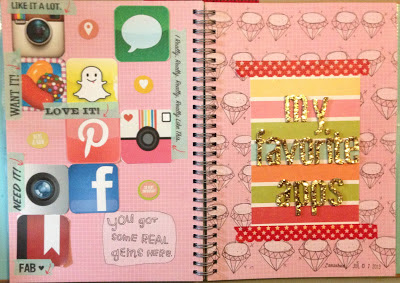
Onto the SMASHbook page! I've been wanting to do a page about some of my favorite phone apps. I printed and cut out the icons and arranged them in a patchwork pattern. I'm using this for an older Challenge in the Smash Your Scraps Facebook group.

Here's my favorite gold Thickers again:


Here's nine of my favorite apps - Instagram, Message, Candy Crush, Snapchat, Pinterest, A Beautiful Mess, Camera, Facebook, and Momento.


And both pages together:


*Oh, and that title? it's from the Parent Trap*


Project Life Weeks 25 & 26 - Part 1

Wednesday, July 10, 2013


I did things a little differently for Weeks 25 and 26 because we took a road trip that overlapped both weeks. I decided to do one page for the 'little things' each week, and a two-page spread for the road trip. I'll be sharing it soon!

For now, here's how both weeks look in my PL album:


And the left side, Week 25: I made my paper umbrella wreath, somehow squeezed a huge return into one tote at work, got a pedi, and admired my plants.


Here's a screenshot of a level in Candy Crush that stumped me for a few days. I added a SMASHbook fortune to the bottom of the phone screenshot.


And the right side, Week 26: my star-spangled mani, a mother-daughter shopping trip, my thrift store finds, the cover of my Find Your Voice mini album, and my mess of a desk.


How cute is this little frame?? It's part of a pull-apart 12x12 page I got at a not-so-local scrapbook store. I thought it was perfect for a picture of my hubby getting our camper ready for our road trip :)


My mom and I went to our "local" scrapbook store (that's 2 hours away!!). We had a 25% off customer loyalty day and a $37 credit to split. I grabbed a business card to add to my PL. The background is a 4x6 Kraft filler card that I cut down to a 4x4.


I took a picture of my craft table, so I could remember what it looked like at this day in time.


Have you ever done less than a 2-week spread of a week? Or combined two weeks into one?

I'm linking up at The Mom Creative again, with lots of talented PLers! Go visit and be inspired!!

I love reading each and every comment! Be sure to keep up with me on Instagram, Pinterest, and Facebook!

LinkWithin

Related Posts Plugin for WordPress, Blogger...
Proudly designed by Mlekoshi playground