Pages

Friday, March 28, 2014

Project Life Weeks 8 and 9

Friday, March 28, 2014


It's finally Friday! For some reason this has been a long week for me. I felt like Thursday was the end of the week. Wishful thinking, huh?!

I combined weeks 8 & 9 to make one Project Life layout. This time I used the Azure kit that I got from my blogging friend Elise (have you seen her blog?? She seriously does amazing projects! And her instagram gallery is to die for. I am constantly amazed at the photos she takes and how she interprets photo a day challenges). There are a few Azure cards that I don't think I'll ever use (mostly the butterfly ones) but overall this kit is gorgeous!

Full spread:


Left side: manicure, cookies, going out with friends, and hanging out with Mom.


I love the pages I've seen lately where people sew across a pocket and make it into triangles. I'm too lazy to drag out a sewing machine, so I just used my Project Life journaling pen to draw some "stitches" around this card. 


And this one:


Right side: visited Harley (and Dad), eating breakfast with Joe, X-rays at the doctors office. I *love* this picture of Joe... I like to try to sneak and take pictures of him when he isn't looking. He caught me on this one but it turned out great :)


I used this card to document the name of our favorite Mexican restaurant.


Simple fabric stickers (from Target!) and enamel dots:


Have a great weekend!!

I love reading each and every comment! Be sure to keep up with me on Instagram, Pinterest, and Facebook!

Thursday, March 27, 2014

Exciting News

Thursday, March 27, 2014


So I have some exciting news!!

 I am now a City Chick, part of the design team at Scrappin' in the City a Knoxville, TN scrapbooking boutique. Even though it's a couple hours away from me, it's the only "local" scrapbooking store in this area! It has a great selection of products and an amazing upstairs space for crops. Seriously, if you're a nearby scrapbooker that wants to have a fun crop one weekend (or weekday depending on our schedules), let me know!

I'm super excited to get started! I get to pick which paper collections I want to work with. I'll be making 3 design pieces each month and displaying them in the store. I'll be sharing the projects on their blog and here as well.


Here's a little sneak peak -
I've been working on projects using Allison Kreft's "Sprinkled with Love", My Mind's Eye "Record it!". Love the colors in each of these. I also have something in the works using Basic Grey's Spice Market... or maybe Bella Blvd's "Lucky Starz" - I haven't decided yet!

Hope you're having a great week! I'll be back with some Project Life to show you tomorrow!

I love reading each and every comment! Be sure to keep up with me on Instagram, Pinterest, and Facebook!

Friday, March 21, 2014

Project Life Week 7

Friday, March 21, 2014


I'm back with Week 7 - my least colorful week of Project Life. Ever! I was really digging black, white, and pink. It's kinda Valentine's Day, right? There's a little bit of Studio Calico, Kiwi, and Plus One sprinkled in there. I love how much you change the look of a kit by simply picking 2 or 3 colors and sticking to it for the whole spread. These pictures are not the best, but it's been overcast!

Full spread: So I went out and took a panorama picture of our backyard. Joe did something to it in PhotoShop and made it 3 4x6 photos for me to print. LOVE it! I will definitely be begging him to do this again for me.


Left side:


I cut out a calendar from a Studio Calico card and added it to another card.


Joe always takes care of me, even when he's hurt or injured.


Right side: we got 7.5 inches of snow - a huge snow for us!! I made our first snowman together... Joe was on crutches and mostly had to refresh my memory on snowmen and then supervise my building. We used jelly jeans for his eyes and mouth.


What's the biggest snow you had this year? Did you build a snowman? I'm so glad Spring is here now!!

I love reading each and every comment! Be sure to keep up with me on Instagram, Pinterest, and Facebook!

Monday, March 17, 2014

Project Life weeks 5 and 6

Monday, March 17, 2014


So I haven't been great about taking pictures so far in 2014. Too much going on! I combined weeks 5 and 6 to make up for the lack of pictures. I used several Studio Calico cards on this spread.

Full spread:


In week 5, Joe had a consult with the doctor about knee surgery. He was told that they couldn't do his surgery and that we would have to travel to a university hospital 4.5 hours away! We're glad we decided to seek a second opinion... He had an appointment with his actual surgeon on the following Monday and had surgery the next day. Did I mention this was my first and second week of the new job?? Talk about hectic!


A couple of chipboard stickers from Studio Calico's Sugar Rush PL kit were the perfect finishing touches on this Coral card:


The "#Real life" sentiment is a stamp - super cute!


Right side: MSHA is the company I'm now working for.


I really like how this Midnight "hello there" card turned out! And the "She believed she could so she did" was a card I made back in September. Love it!


How cute are these stickers?


Yes, I have a pink tub.


I love reading each and every comment! Be sure to keep up with me on Instagram, Pinterest, and Facebook!

Friday, March 14, 2014

Whale Card

Friday, March 14, 2014


Want to see a super cute card that my mom made?? Okay!

This whale is a Cameo cut - cute, huh? She took the pink cheeks off the original design. That is what makes the Cameo such a versatile tool - you can edit and make things your own! She stamped the sentiment. I love how she made the waves out of patterned paper!


And she made a matching envelope :) How adorable!


I love reading each and every comment! Be sure to keep up with me on Instagram, Pinterest, and Facebook!

Thursday, March 13, 2014

Around Here

Thursday, March 13, 2014


Around here:

  • Joe is (officially) off crutches as of yesterday!
  • We went and looked at some cabinet and countertop options for our bathroom. Soon it will be goodbye, Pepto Bismol pink sink! (I will miss you a little bit though really). Pink tub, you're next on my list!
  • I just found out that my FitBit app will sync with My Fitness Pal and RunKeeper. Too cool!
  • I've been able to get a paperwork system down for some work consults. Less stress = smoother appointments = feeling like I (mostly) know what I'm doing.
  • I'm loving the flexibility of my work schedule.
  • We celebrated our anniversary in Charlotte this past weekend. We totally had a pay it forward moment! 
  • My office looks like an episode of Hoarders.
  • I just finished PL weeks 5 and 6. Small victory. I have struggled with that layout and walked away from it twice!
What's going on with you?

I love reading each and every comment! Be sure to keep up with me on Instagram, Pinterest, and Facebook!

Monday, March 10, 2014

Elevate - One Little Word for 2014

Monday, March 10, 2014


This year, I decided to participate in a workshop called One Little Word.  Every month, I'll receive a lesson to help me focus on, be inspired by, and remember my word for the year. This isn't a New Years resolution - it's just a way to stay focused for the year and improve your life. I've chosen "elevate" because I want to take everything in my life to the next level and make it even better than it already is - marriage, family, relationships, health, career, creativity and more.

This picture was taken from my first week of PL 2014. I wanted my word to be involved in PL throughout the year. The first week was the best place to start!


Look at this pretty "Radiant Orchid" binder. So pretty!!


I wanted a symbol for my word, so I have chosen a little mountain based off that button in the second picture. I used my Cameo software to trace the image and used digital papers to perfectly match Crate Paper's On Trend paper collection. LOVE THEM!


I got a later start on putting my book together, but there's no time like the present!


Love this little leopard print mountain. Went a little crazy on the enamel dots but they're too cute!


This is why I chose my word and my quote.


Cute little collage in the bottom corner:


Here I gave some thought to several questions - how Elevate is already in my life, what I want more of and less of this year, What I'm most afraid of this year, and what I'm most excited about this year.


My intentions for using my word throughout 2014 - 


This is a spot to record monthly thoughts or accomplishments or highs and lows. I cut up some grid paper and the small sheets will go on top of each of the patterned papers. I stuck a couple of the small sheets down in the bottom 2 pockets so you can see what it will look like.


Are you participating? What's your word?

I love reading each and every comment! Be sure to keep up with me on Instagram, Pinterest, and Facebook!

Thursday, March 6, 2014

Paper Medallion Tutorial

Thursday, March 6, 2014


I have a little tutorial for you today - Mom used this technique when we made all the decorations for my cousin's baby shower and I just had to share! Now bear with me - the pictures aren't the best, but sometimes you have to work with what you've got :)

First, cut strips of paper (we used 2" x 12" strips). You can leave them plain on both edges OR use a border punch down one side to give your medallion some extra flair. Next, you want to score the paper every half inch, and then fold it back and forth until you get something that looks like this:


Or you can use your Cameo and make it even faster! We used a cut file from the Silhouette Online Store, but you could easily draw the strip, perforate it every half inch, and then cut it out and fold the paper. You could add hearts, stars, or a scalloped edge to one side to make it pretty.


We ended up using 2 strips to make each medallion. Just glue two folded pieces together and then bring your ends together, forming a circle. An easy way to hold that circle shape is by placing your papers in a small box lid:


Mom cut out one corner so she could slide in a popsicle stick. We were making things for the centerpieces.


Glue a circle to each side of the medallion:


And put something on top of it to hold it in place until it dries!


You could add a sticker, initial, charm, or a die cut to the circle to embellish the medallion.


How cute is that??

I love reading each and every comment! Be sure to keep up with me on Instagram, Pinterest, and Facebook!

Monday, March 3, 2014

Baby Shower Decorations

Monday, March 3, 2014


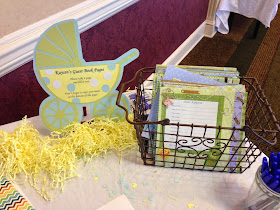
My mom and I recently made decorations for my cousin's baby shower. Everything turned out so cute (if I do say so myself). We could not have done this project without the Silhouette Cameo.

This was the inspiration - an adorable party line that my aunt Patti found at the Dollar Tree. We used the color scheme and buggy throughout the decor.


We made a miniature version of these baby blocks. We found 8"x8" white boxes at Michael's, cut out shapes on the Cameo, and used washi tape for the borders. Adorable!!


We made a banner with his name (Kaycen Laine) on it. We put a star in the middle and two large buggies on either side.


Here's the finished centerpieces. They looked like presents springing open. We glued a ribbon around white 6" x 6" boxes from Michaels. We glued the buggies and paper medallions to popsicle sticks and wooden dowels for varying heights. Mom attached covered wire to the stars so they moved around and looked like they were bursting out of the box. We used styrofoam in the middle to hold everything together. A little bit of yellow straw covered up the styrofoam. Too cute!


We used all the leftover "trash" from the cameo cuts for table confetti:


I modified a buggy cut file and Mom added punched holes to mimic the napkin. We also made coordinating paper medallions. 


Mom and my aunt Patti also spent a lot of time making pages to go into a scrapbook album. Each guest filled out a letter to the baby. The letter included sentiments like "I hope you learn _______, I hope you aren't afraid _______, I hope you grow ________". I'm sure these pages will be fun to read! All the new mom has to do now is slip those pages into the 8" x 8" album.


We had a lot of fun working together on this project. I'm very lucky to have a crafty mom!! <3

I love reading each and every comment! Be sure to keep up with me on Instagram, Pinterest, and Facebook!
Proudly designed by Mlekoshi playground