Pages

Thursday, October 31, 2013

October 2012 - Project Life Smash

Thursday, October 31, 2013


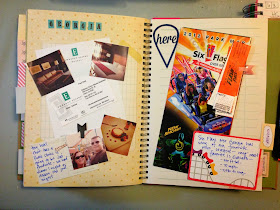
Here's what I did for October 2012 in my Project Life SMASHbook - I used the pretty pink smashbook to do my own version of Project Life. I was testing it to see if I would be able to keep up with the "little things" that happened each month before I committed to doing a full blown Project Life 12x12 album.

We bought our camper last October!


This cute little Dracula and witch are from a Krispy Kreme doughnut box - you can use anything on a smashbook page! I also documented out trip to North Carolina for the Wooly Worm Festival. So fun!


We also went to Six Flags in Atlanta - it's something we do every year in October. We love the roller coasters!


I love reading each and every comment! Be sure to keep up with me on Instagram, Pinterest, and Facebook!

Wednesday, October 30, 2013

Geometric Card - PL Card Swap

Wednesday, October 30, 2013


I joined a couple of card swaps for October. This one's theme is Geometric shapes. I'm really into graphic, geometric shapes at the moment, so this swap was perfect for me.


I used my Silhouette to make this card - First, I drew a rounded rectangle that was roughly 3"x4". I just drew a triangle, copied and rotated it twice, then copied and pasted those 3 triangles all over the card. I deleted any triangles that went beyond the 3"x4" card. (Does this make sense? If not, tell me - I will make a quick tutorial).

I decided to leave the card as is - I didn't attach another paper to it. I think it would look great with orange behind it (for fall) or green behind it (for Christmas or a nice December Daily) or blue (for a winter embellishment). I left it open so the recipient can decide what to do with it!


Which color do you think you would use behind it?

I love reading each and every comment! Be sure to keep up with me on Instagram, Pinterest, and Facebook!

Tuesday, October 29, 2013

Project Life Week 40

Tuesday, October 29, 2013


Week 40 was another week I consolidated in my PL this time. I just stuck to the highlights and did some journaling. I used the new Cut and Paste PL mini kit. I love this kit! I also included my little Fall confetti card I made the other day.

We went to Boone, a friend called right when I needed her to, hubby gave me flowers, and I started decorating for fall.


I love this sunrise picture - my hubby sent it to me on his way to work. Absolutely gorgeous!


This little metal thing is from the September Oh Deer Me! embellishment kit. It's too cute! I used a big foam glue dot to attach it to the card.


I love reading each and every comment! Be sure to keep up with me on Instagram, Pinterest, and Facebook!

Monday, October 28, 2013

Fall Confetti Card

Monday, October 28, 2013


Making a confetti shaker card has been on my To Do list for quite a while. I haven't been in much of a crafting mood lately, but decided to play around and I came up with this. I love it!


I did my own take on the confetti card. I wanted to put this in my Project Life, but I didn't want all the confetti to settle at the bottom. I used some spray adhesive on some vellum and then dropped some confetti onto the vellum. I added a couple of leaf stickers. I like the look of sewn shaker cards, but I'm not about to drag out my sewing machine for something so small - so I used washi tape to seal the edges. I think it turned out pretty good! Here's the confetti card in a Project Life spread.


Have you made a confetti card? Do you like the stitched look or washi tape better?

I love reading each and every comment! Be sure to keep up with me on Instagram, Pinterest, and Facebook!

Friday, October 25, 2013

Project Life - Week 39

Friday, October 25, 2013


I decided to do 1-page spreads for Week 39 and Week 40 this time. I didn't think I had enough to do a 2-page spread for each week. And of course, as I was making these two weeks, I felt like I was kind of squeezing it all onto one page. Ha! That's how it goes sometimes.

Week 39: back to work after vacation, beautiful flowers from my hubby, Oh Deer Me! embellishment kit arrived, and we ate at Mellow Mushroom.


I couldn't wait to go to Target and try on these silly foam Halloween hats!


I started making a fall wreath using Basic Grey's "Persimmon" line. I can't wait to show you - I love the colors in this collection!


Have you ever consolidated a usual 2-page spread down to 1 page? Did you feel cramped?

I love reading each and every comment! Be sure to keep up with me on Instagram, Pinterest, and Facebook!

Thursday, October 24, 2013

Halloween Paper Medallion Wreath

Thursday, October 24, 2013


I made this paper medallion wreath last year, before I started my blog. I absolutely love it! I hung it up again this year on my fireplace. I used some cute paper from K&Co and some matching embellishments.


First, I cut strips of paper 3" and 4" wide and 12" long. I used my Martha Stewart scorer board to mark the paper in 1/4" increments, then folded the papers back and forth to form the medallions. I used 2 or 3 strips to make each medallion.

I used decorative border punches along one side of several strips of paper to give some medallions a different look.


 I used a punch to make circles to cover the centers. I used the embellishments to decorate every center. Here's one of my favorite medallions: 


They're so pretty laid out on the table!


And here's the finished product. I love how it turned out!


I love reading each and every comment! Be sure to keep up with me on Instagram, Pinterest, and Facebook!

Wednesday, October 23, 2013

Featured Designer at Life.Paper.Scrapbook

Wednesday, October 23, 2013


Hi! Today I'm thrilled to be featured over at the Life.Paper.Scrapbook blog.

 photo FeaturedDesignerAvatar_zps817baa74.jpg

Please stop by and have a look!

I love reading each and every comment! Be sure to keep up with me on Instagram, Pinterest, and Facebook!

Tuesday, October 22, 2013

Project Life - Joe's Birthday

Tuesday, October 22, 2013


I used this first page to document our plane trip, the resort, the room, and the snacks and balloons I had delivered to the room before we arrived:


I made Joe take a couple of pictures of me on these little scooters that were scattered around the resort: This wood veneer is from the September Oh Deer Me embellishment kit:


I just added a couple of Thickers to complete this card:


I included pictures of Joe's birthday cards (including the one I made him), a slightly blurry photo of us outside The Palm restaurant, the 40th birthday button he got at Universal Studios, and the birthday card signed by the employees at The Palm.


I love reading each and every comment! Be sure to keep up with me on Instagram, Pinterest, and Facebook!

Monday, October 21, 2013

Final 30 Days of Lists September

Monday, October 21, 2013


Here's my final post for 30 Days of Lists, September 2013.  I used Glitz 'Wild and Free' collection to make my own mini book. I LOVE how it turned out.


Although I finished my lists during September (can you believe it?!), I'm just now getting around to posting them. I inadvertently took a two-week hiatus from blogging. Don't you hate it when life gets in the way of your crafting? Anyways, I'm back!

Day 26: Rules for being my Friend (am I too tough? I don't think so).


Day 27: Favorite Classes / Courses / Workshops


Day 28: In my Fridge:


Day 29: October Plans


Day 30: Things I want to Remember:


Have you made it all the way through your lists?

I love reading each and every comment! Be sure to keep up with me on Instagram, Pinterest, and Facebook!

Friday, October 4, 2013

Make Custom Cameo Stickers

Friday, October 4, 2013


This sticker tutorial using fill patterns got me thinking about how to make my own stickers using my Silhouette Cameo. I swear, this machine does more than I can imagine! I'm always finding new things to do with it.


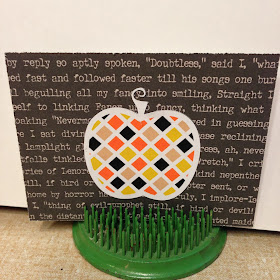
I used the white printable sticker paper and the Print and Cut feature to customize these pumpkins. If you don't have the printable sticker paper, no worries - you can still follow this tutorial and make your own diecuts using paper or cardstock. I could use them on cards, party favors or decorations, or in my Project Life album.

Ok, here's how to make it happen!

Open your cut file and resize it to whatever size you want. Next, you want to right-click and ungroup the file, then right-click again and release the compound path. This allows you to select each part of the file and change the color.

If you want to have an outline around your shape, you can change the line color for your pumpkins. I chose black.

 Then you can change the thickness or style of the line.


Next, you add the registration marks. This allows the Cameo to detect exactly where your cut files are on the page. Be sure to move your pumpkins into the printable area. Notice I had my pumpkins up at the top of the page while I was working on the colors. If I hadn't moved them, part of them would not have printed.

Next, you need to tell the Cameo what you want cut out. When you first get to this screen, every single shape will be outlined in dark red. We don't want each shape to be cut out - we just want the outline to be cut. To do this, I had to select all the shapes and select "no cut" to erase all the cut lines first. Then just click on the outline of each pumpkin and change your cut lines to just "cut edge".
Next put your sticker paper through the printer. Then adhere it to your cutting mat and tell the Cameo to automatically detect the registration marks. When prompted, change your settings to "Printable sticker paper" and dial your blade down to a 2. Then you're ready to cut!

Imagine what fun, customized stickers (and die cuts) you can make!!


I love reading each and every comment! Be sure to keep up with me on Instagram, Pinterest, and Facebook!

Wednesday, October 2, 2013

Project Life Weeks 37 and 38

Wednesday, October 2, 2013


I got a little creative with Weeks 37 & 38 this time - I combined the beginning of Week 37 and the end of Week 38 into a two-page spread. We took a trip for hubby's 40th birthday that spanned across both weeks. That trip needed its own two-page spread (and inserts) so I'll be posting those soon.

Full page spread: I had just received Amy Tangerine's Cut and Paste PL mini kit and used a few cards from it. I also used Jade cards, part of a new 6x6 paper pad from Target (called Everyday), and Honey cards. I did a lot of mixing and matching this week too.


Left side: my fun 2-hour adventure at Target, pumpkin spice latte, and a fun little gift from a friend.


Fall definitely starts with pumpkin spice lattes:


This instagram fit on the back of the previous week's card just right!


I added some flair from Studio Calico's Thataway collection. Love!


Right side: Rhythm and Roots festival, new magazines, new mani, and a painting I bought on Etsy.


I told Joe to smile for a pic, and this is what I got. I love this picture :)


I"m linking up again at The Mom Creative's Project Life Tuesday.

I love reading each and every comment! Be sure to keep up with me on Instagram, Pinterest, and Facebook!
Proudly designed by Mlekoshi playground